WarnGen Walkthrough
WarnGen is an AWIPS graphics application for creating and issuing warnings as is done by National Weather Service offices. In the NSF Unidata AWIPS release it is a non-operational forecasting tool, meaning it allows users to experiment and simulate with the drawing and text-generation tools, but prevents you from transmitting a generated warning upstream.
In order to select a feature it must be within your CAVE localization coverage (load Maps > County Warning Areas to see coverages)
Quick Steps - Using WarnGen in NSF Unidata AWIPS CAVE
- Load NEXRAD Display from the Radar menu
- Choose a CWA with active severe weather (BUF is used in the video below)
- Re-localize to this site in the CAVE > Preferences > Localization menu
- Exit out of CAVE and reload (you should notice the new CWA at the top of CAVE)
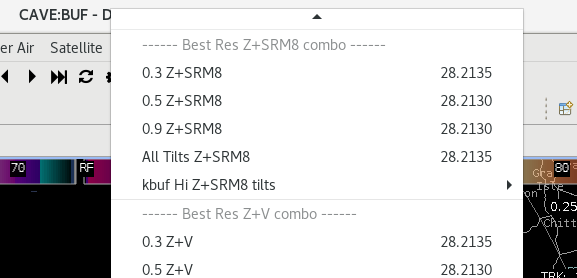
- Load radar data from the local radar menu kbuf > Z + SRM8
- Use the "period" key in the number pad to toggle between the 0.5 Reflectivity and SRM
- Click WarnGen toolbar button
 or load from Tools > WarnGen
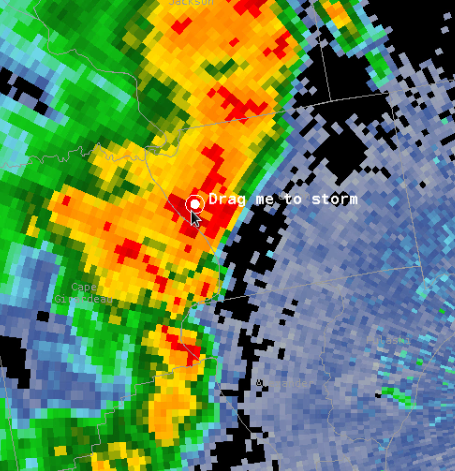
 - Drag the storm marker to the center of a storm feature
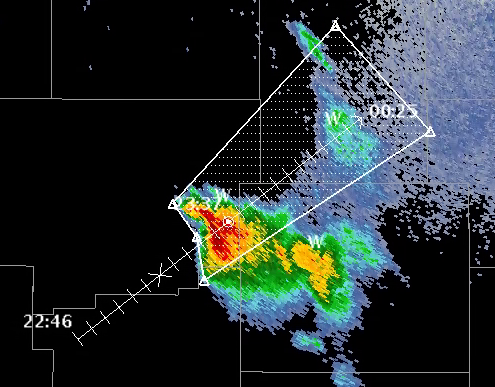
- Step through frames back and forth and adjust the marker to match the trajectory of the storm feature
- Click Track in the Warngen GUI to update the polygon shape and trajectory
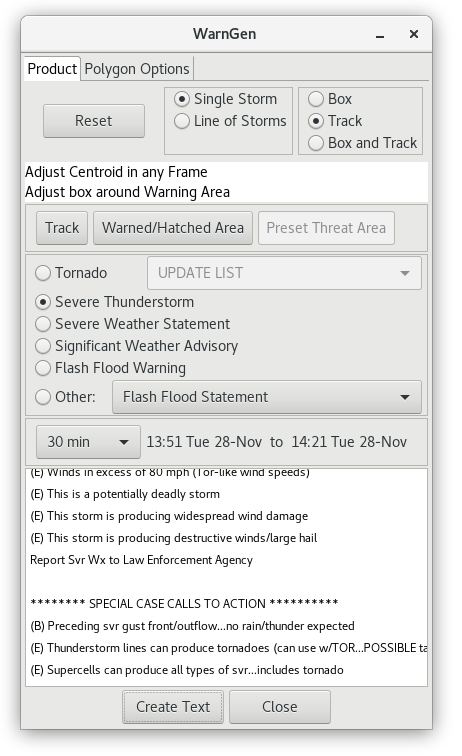
- From the WarnGen dialog select the type of warning to generate, time range, basis of the warning, and any threats (wind, hail, etc)
-
Click Create Text at the bottom of the WarnGen dialog to generate a text warning product in a new window
-
Click Reset at the top of the WarnGen dialog to reset the storm marker at any time
- Select Line of Storms to enable a two-pointed vector which is to be positioned parallel to a storm line
- To add another vertex, middle button click along the polygon
Video - Using WarnGen in AWIPS
The video below walks through creating a warning polygon and text in AWIPS. More detailed information can be found in the text below the video.
Load NEXRAD level 3 display
Select the menu Radar > NEXRAD Display and note coverage areas of current severe weather. We choose a CWA ID that contains some active severe weather (BUF Buffalo, New York, in this example).
Select SITE Localization
Open CAVE > Preferences > Localization, select the CWA site ID (BUF) for the coverage area you want to use, followed by Apply and Okay and restart CAVE. Once CAVE is restarted, you should notice the new CWA at the top of the CAVE window.
Load single radar data from the local radars
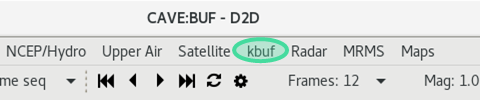
Use the specialized site menu for the local radar data products, ex. Click on the local radar kbuf > Z + SRM8.
This menu includes several sections with submenus for all available radar data at that site.
Use the "period" key in the number pad to toggle between the 0.5 Reflectivity and SRM.
Launch WarnGen
Select WarnGen from the D2D Toolbar or from the Tools > WarnGen menu. When started, the storm centroid marker appears and the WarnGen GUI will pop up as a separate window.
Generate a Storm Motion Vector
- Click and drag Drag Me to Storm to the feature you want to track (WarnGen uses a dot to track a single storm and a line to track a line of storms).
- Step back 3 to 4 frames.
- Drag the dot to the previous position of the feature you first marked to create the storm motion vector.
- Click the Track button in the WarnGen GUI to update the polygon based off the storm motion.
- Review the product loop and make adjustments to ensure the vector is accurate.
The initial polygon may have unhatched areas that will be removed from the warning due to crossing CWAs or not meeting area thresholds in the county for inclusion. The Warned/Hatched Area button allows you to preview the polygon shape that will be issued, so you can make further edits.
Moving Vertex Points
Vertices can be moved by clicking and dragging with the mouse. The warning polygon, including stippling, will update automatically.
When reshaping your warning polygon in this manner, the philosophy is to include all areas that are at risk of experiencing severe weather covered by that warning type. Effective polygons account for uncertainty over time and typically widen downstream.
Add and Remove Vertex Points
There will be some occasions where you will want to add vertices to your warning polygon. Most often, these situations will involve line warnings with bowing segments or single storm warnings where you want to account for storm motion uncertainty or multiple threat areas that may have differing storm motions.
New vertices are added to the warning polygon two ways. Either by Right Mouse Button "click and hold" or a simple Middle Mouse Button click on the warning polygon line segment where you want to add the vertex.
Vertex points are removed from the warning polygon using the same context relative menu. Instead of selecting a line segment, you select the vertex you wish to remove and then right mouse button click and hold and select remove vertex.
Redrawing a Polygon
Click the Reset button to clear the current polygon and vector and reset the storm centroid marker. Generate a new storm motion by moving the storm markers and select the Track button in the WarnGen GUI to draw the new polygon.
Text Window
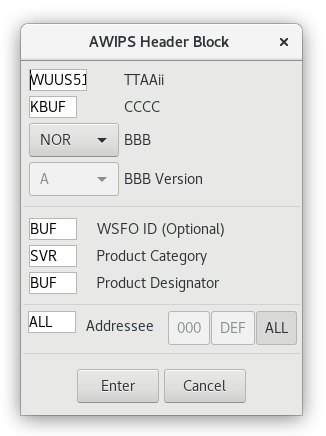
Once you are satisfied with your polygon and have chosen your selections, click Create Text in the WarnGen GUI. Initially the AWIPS Header Block window appears. Click Enter for the text window to open.
This will open the Text Window.
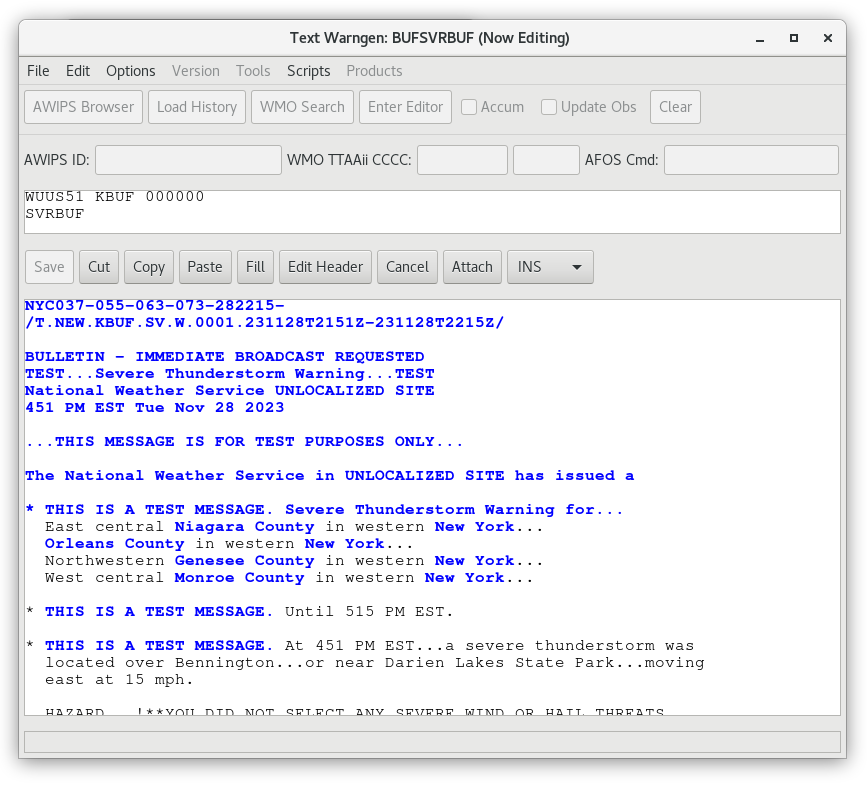
Using the customized settings in the WarnGen GUI, WarnGen translates the information into a text product that is displayed in a text window on the Text Display. The auto-generated text contains the storm speed and direction, the counties and cities affected by the warning/advisory, the valid times of the product, the warning/advisory body text (including any optional bullets selected in the GUI), and additional code to help our partners to efficiently process and disseminate the warning/advisory. The locked parts of the text are highlighted in blue and most of your text should not need to be edited if you configured your WarnGen window correctly.
The NSF Unidata AWIPS release is non-operational. You will be allowed to simulate the drawing and text-generation of warnings, but are prevented from transmitting a generated warning upstream
Note: Edits made to product text in the editor window should be limited to items such as forecaster name/initials, call-to-action text, etc. If changes are warranted for items such as storm motion, warned counties, or Latitude/Longitude points, close the editor window and make changes using the D-2D and WarnGen graphical tools, then recreate the polygon and/or the text.